by aaron | Jun 12, 2026 | Uncategorized
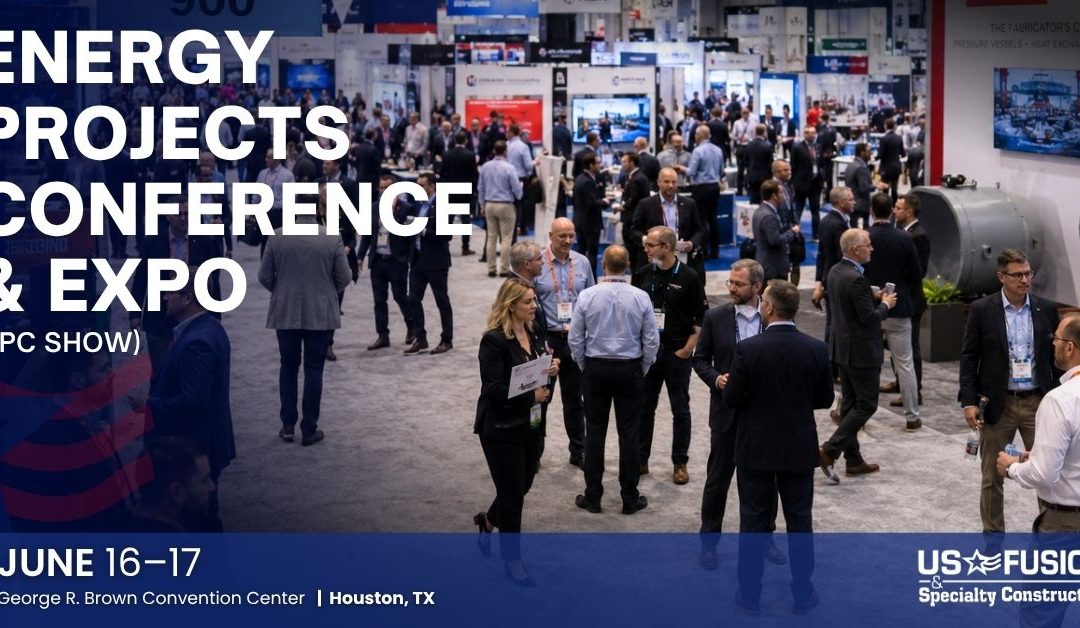
BATON ROUGE, La. – June 9, 2026 – US FUSION & Specialty Construction, a specialty plastics contractor headquartered in Baton Rouge, Louisiana, has announced it will attend the 2026 Energy Projects Conference & Expo (EPC Show), scheduled for June 16-17 at the George R. Brown Convention Center in Houston, Texas. US FUSION & Specialty Construction is a 100% employee-owned company with more than 35 years of experience delivering turnkey specialty plastics piping systems, custom spool fabrication, geosynthetic containment, and specialty construction solutions to clients across the energy, manufacturing, data center, municipal, and government sectors.
Event At a Glance
EPC SHOW 2026 – EVENT DETAILS
WHO: US FUSION & Specialty Construction
WHAT: Energy Projects Conference & Expo (EPC Show) – Attending
WHEN: June 16-17, 2026
WHERE: George R. Brown Convention Center | Houston, TX
CONTACT: usfusion.com
Gulf Coast and National Service Area
US FUSION & Specialty Construction provides specialty plastics construction services to clients across Louisiana, Texas, and the Gulf South, with project experience extending throughout the continental United States. Primary service corridors include Baton Rouge, Cameron, Lake Charles, and the greater Houston, Texas, industrial market. The company operates from its Baton Rouge headquarters and fabrication facility, supporting both off-site spool fabrication and 24/7 emergency field deployment. US FUSION & Specialty Construction has completed specialty plastics piping and containment scopes for LNG export infrastructure, DOE-affiliated government facilities, refineries, chemical plants, data centers, and municipal systems in Louisiana and beyond.
Specialty Plastics Fabrication, Fusion, and Piping Capabilities
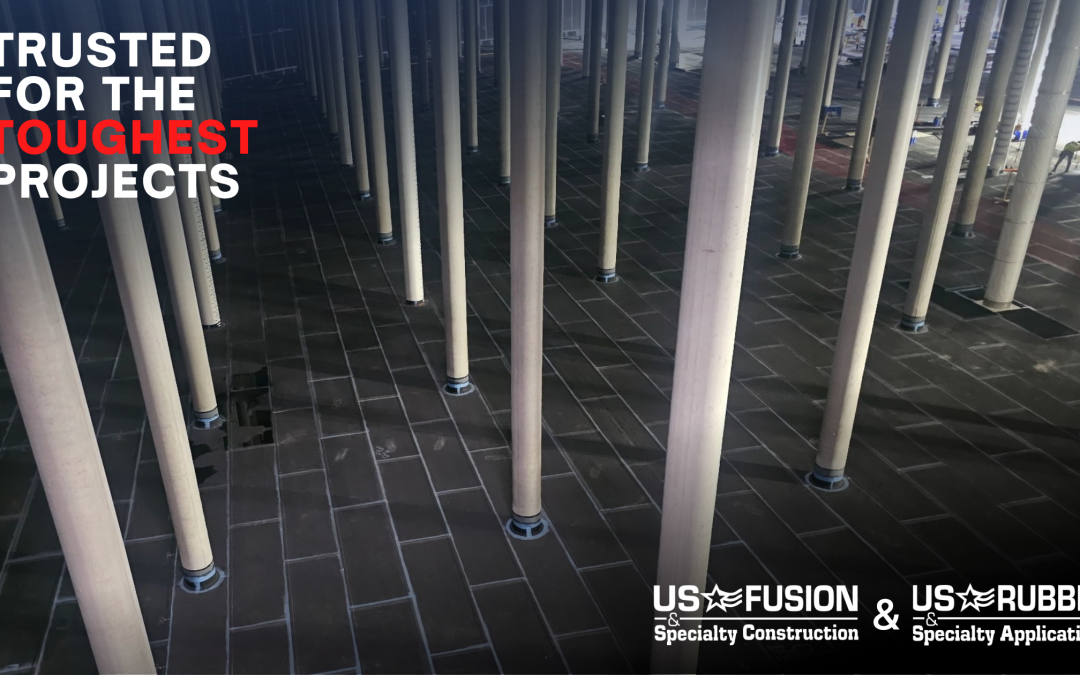
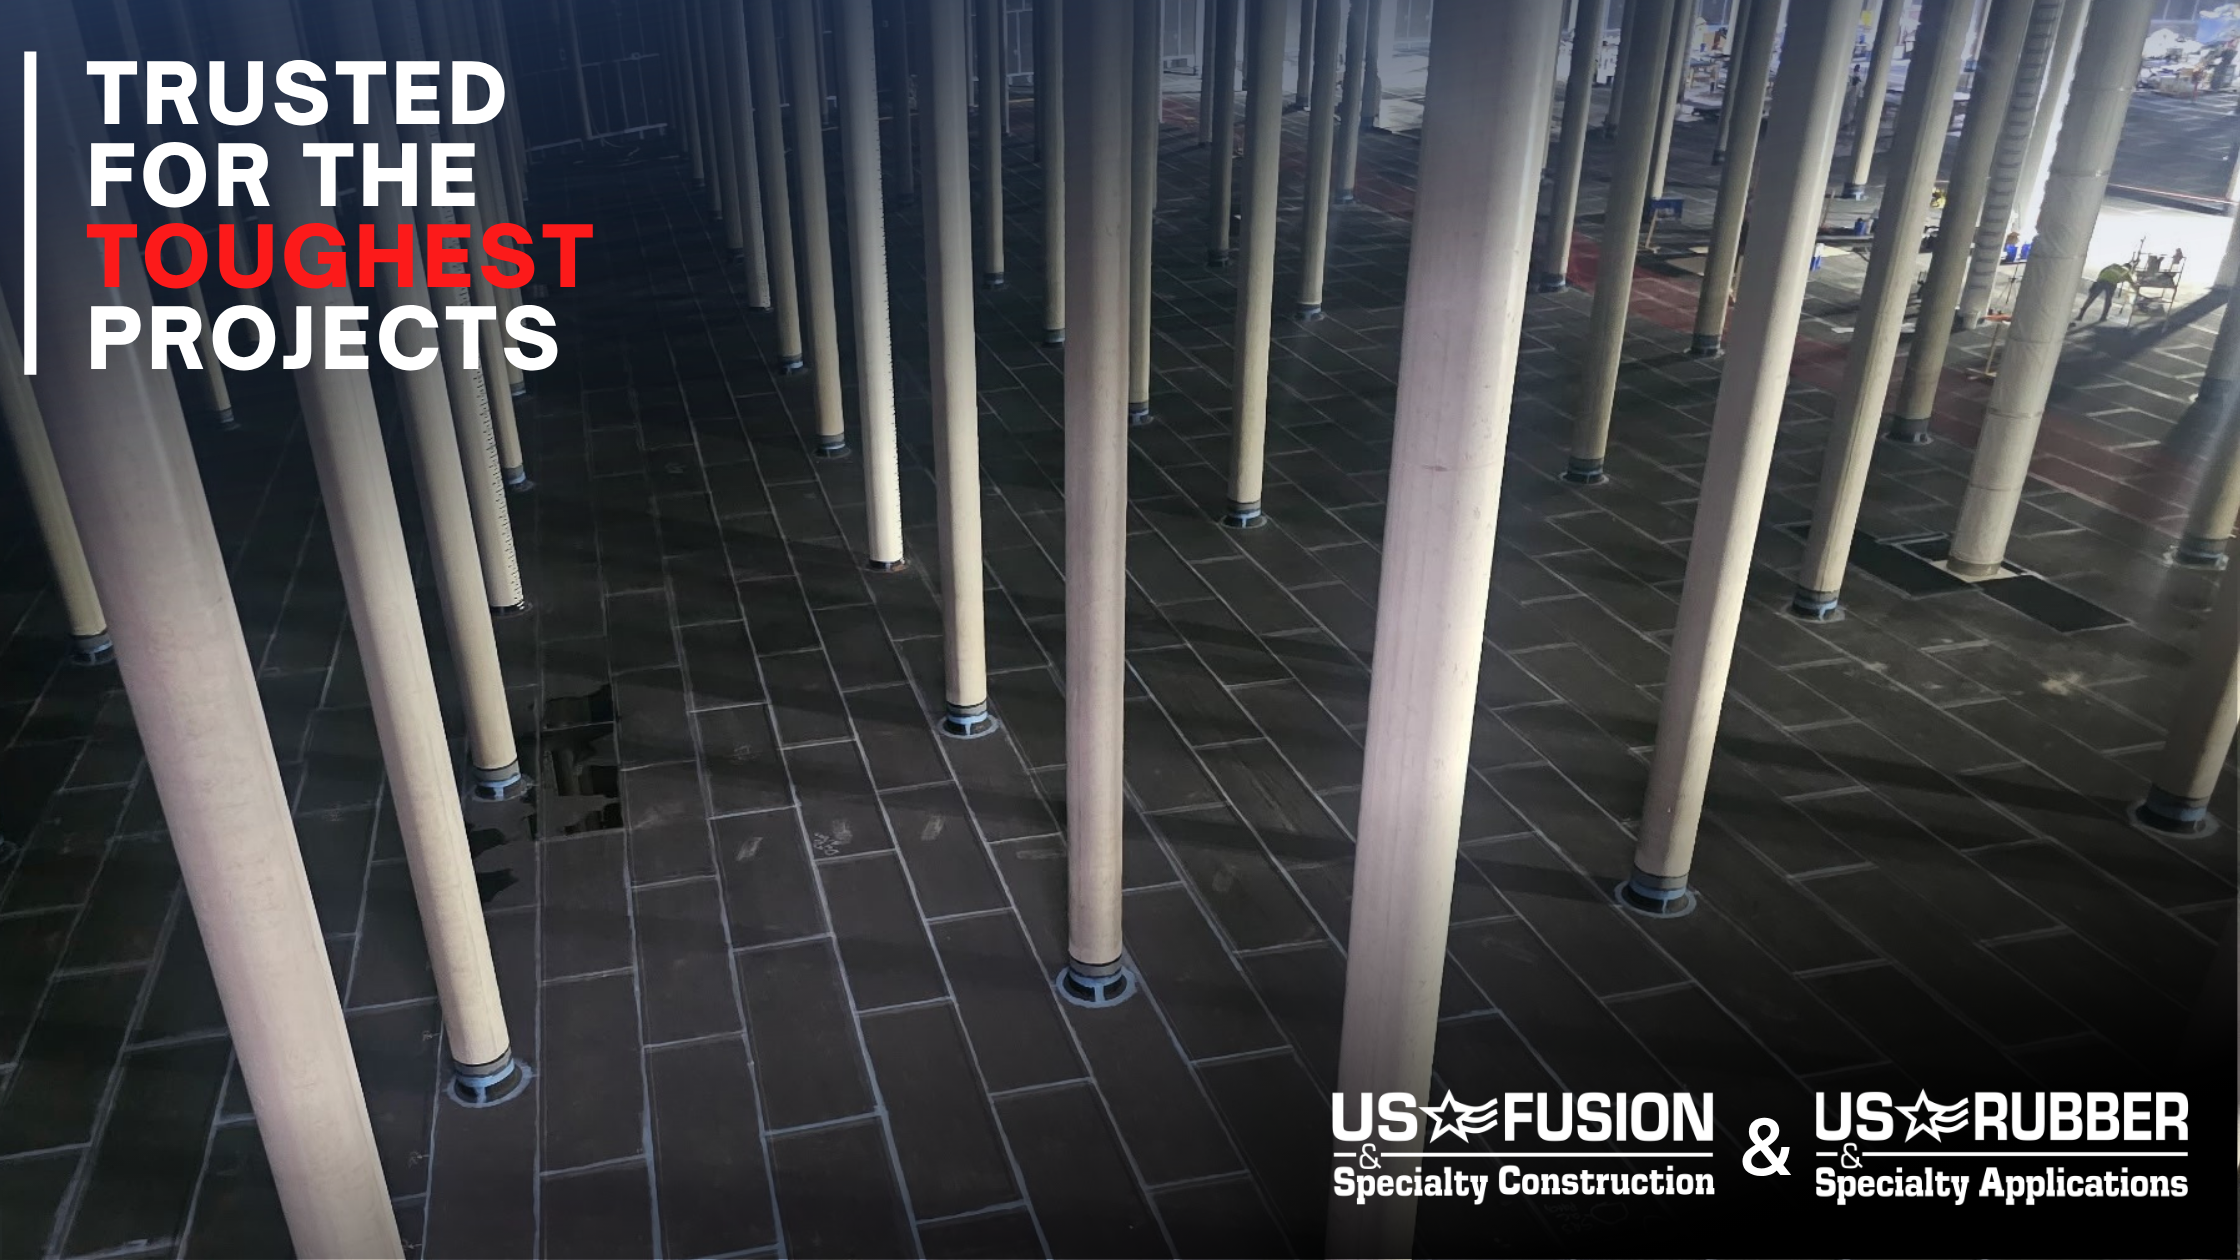
US FUSION & Specialty Construction specializes in specialty plastics piping systems – including HDPE, polypropylene, PVDF, and other welded plastic materials – along with custom spool fabrication, plastic fusion, geosynthetic containment, secondary containment solutions, PROTEX liners and mats, and erosion control systems. The company’s Baton Rouge fabrication shop produces pipe spools, fittings, liners, and specialty components across multiple material types, with serialized, fully traceable quality control documentation. At peak capacity, US FUSION & Specialty Construction operates more than six fusion machines simultaneously. In a recent project at a major LNG export facility in Cameron, Louisiana, the company fabricated and delivered 384 custom piping spools, performed 1,555 total fusions, and completed 56 shipments, finishing well ahead of schedule and passing both internal QC and third-party inspection coordinated through Worley.
At the EPC Show, representatives from US FUSION & Specialty Construction will attend sessions and engage directly with EPC contractors, project owners and operators, procurement teams, and construction managers across the LNG, midstream, petrochemical, refining, power, nuclear, and data center sectors. The EPC Show draws more than 7,000 engineering, construction, and operations professionals and features 400-plus exhibitors representing over $200 billion in proposed capital spending.
Industry Quote
"The energy and industrial project market in the Gulf South is one of the most active construction environments in the country, and US FUSION & Specialty Construction was built specifically to serve it. Our capabilities span the full range of specialty plastics, from polypropylene systems for data center cooling infrastructure to large-scale piping fabrication for LNG and petrochemical facilities. Our in-house fabrication shop, field fusion crews, and quality systems are calibrated to the pace and documentation requirements of major capital projects. The EPC Show brings together the project owners and EPCs who are making decisions on active programs, and we look forward to demonstrating what US FUSION & Specialty Construction can deliver."
Dustin Miller, President, US FUSION & Specialty Construction
US FUSION & Specialty Construction is a 100% employee-owned specialty plastics contractor based in Baton Rouge, Louisiana, founded in 1989 with more than 35 years of experience in specialty plastics piping systems, custom spool fabrication, plastic fusion, geosynthetic containment, secondary containment, and erosion control. The company serves clients in the energy, LNG, petrochemical, refining, power, data center, manufacturing, municipal, and government sectors across the Gulf South and nationally. US FUSION & Specialty Construction maintains a full-service fabrication shop in Baton Rouge capable of producing piping spools and specialty components in HDPE, polypropylene, PVDF, and other welded plastic materials, with 24/7 field crews available for both planned scopes and emergency response. Project experience includes major LNG export infrastructure in Cameron, Louisiana, and DOE-affiliated work at the Savannah River Site. US FUSION & Specialty Construction’s sister division, US RUBBER & Specialty Applications, provides industrial rubber lining and specialty lining systems for tanks, vessels, and piping.
For more information, visit usfusion.com.
Media Contact
Patrick Walker
DIRECTOR OF PROJECT DEVELOPMENT
US FUSION & Specialty Construction
US RUBBER & Specialty Applications
FULL SERVICE SPECIALTY CONTRACTOR
(800) 933-8734 | toll-free
(225) 252-1783 | mobile
Patrickw@usfusion.com
www.usfusion.com
www.usrubberlining.com
by suganya | May 26, 2026 | Uncategorized
Press Release
BATON ROUGE, LA – US FUSION & Specialty Construction, a leader in critical infrastructure solutions, today announced the successful completion of the Saltstone Disposal Unit 10 (SDU10) Leak Tight Liner System (LTLS) at the U.S. Department of Energy’s (DOE) Savannah River Site. The monumental project represents the largest and most technically complex contract in the company’s 35-year history.
This achievement marks US FUSION’s third consecutive Bromo Butyl Rubber Liner installation for the DOE’s massive Saltstone Disposal Units, following the successful delivery of SDU8 and SDU9. The series of projects solidifies US FUSION’s position as one of the nation’s elite specialty contractors qualified to handle the most demanding hazardous and radioactive waste containment challenges.
The SDU program is a cornerstone of the nation’s environmental cleanup mission, involving the safe disposal of decontaminated salt solution, a byproduct of processing radioactive liquid waste from national defense efforts. The success of the SDU10 liner system required zero-failure tolerance, absolute precision, and an unwavering commitment to safety protocols.
“The successful completion of SDU10 is more than just our largest project; it’s a testament to the incredible skill, dedication, and safety-first mindset of our entire employee-owned team,” said Dustin Miller, President of US FUSION. “This was a monumental undertaking that required seamless collaboration with our project partners. Completing three of these highly complex liner systems consecutively for the DOE demonstrates a level of trust and performance that we are incredibly proud of. This milestone proves our capability to handle the nation’s most critical containment challenges, and we are ready for the next one.”
The project’s success hinged on the expert installation of the specialized Bromo Butyl Rubber Liner, a material chosen for its exceptional chemical resistance and long-term durability, which is critical for nuclear-grade applications.
Project Highlights:
- Project: Saltstone Disposal Unit 10 (SDU10) Leak Tight Liner System (LTLS)
- Location:S. Department of Energy (DOE) Savannah River Site, South Carolina
- Scope: Installation of a mission-critical Bromo Butyl Rubber Liner for a 33-million-gallon radioactive waste disposal unit.
- Significance: Largest project in US FUSION’s history and the third in a first-of-its-kind series, reinforcing the company’s expertise in nuclear and hazardous waste containment.
This achievement underscores US FUSION’s core value proposition: providing single-source accountability on projects where quality, safety, and expertise are non-negotiable.
About US FUSION & Specialty Construction
US FUSION & Specialty Construction is a Louisiana-based specialty contractor with 35 years of experience delivering turnkey solutions for HDPE piping systems, geosynthetic containment, and erosion control. As a unique partner that both supplies and installs, US FUSION provides single-source accountability for leaders in the energy, manufacturing, municipal, and government sectors. With an industry-leading 0.77 EMR safety rating, the 100% employee-owned company is the proven choice for clients requiring expert plastic fusion and complex containment systems throughout the Gulf South and beyond. For more information, visit www.usfusion.com.
Website: www.usfusion.com
About US RUBBER & Specialty Applications
As an established industrial rubber lining contractor, US RUBBER & Specialty Applications provides turnkey rubber tank lining services designed to extend equipment life and reduce maintenance costs. Procurement and installation services feature high-quality materials and best-in-class workmanship. US RUBBER & Specialty Applications understands the critical role rubber lining plays in enhancing the performance of pipes, fittings, storage tanks, and clarifiers in demanding environments.
Working with a trusted industrial rubber lining contractor ensures assets are protected from abrasion, chemical attack, and high temperatures. US RUBBER & Specialty Applications regularly performs rubber lining services that Louisiana industrial facilities depend on to maintain operational efficiency, with quality, safety, and longevity guaranteed.
Website: www.usrubber.com
by suganya | Apr 17, 2026 | Uncategorized
Press Release
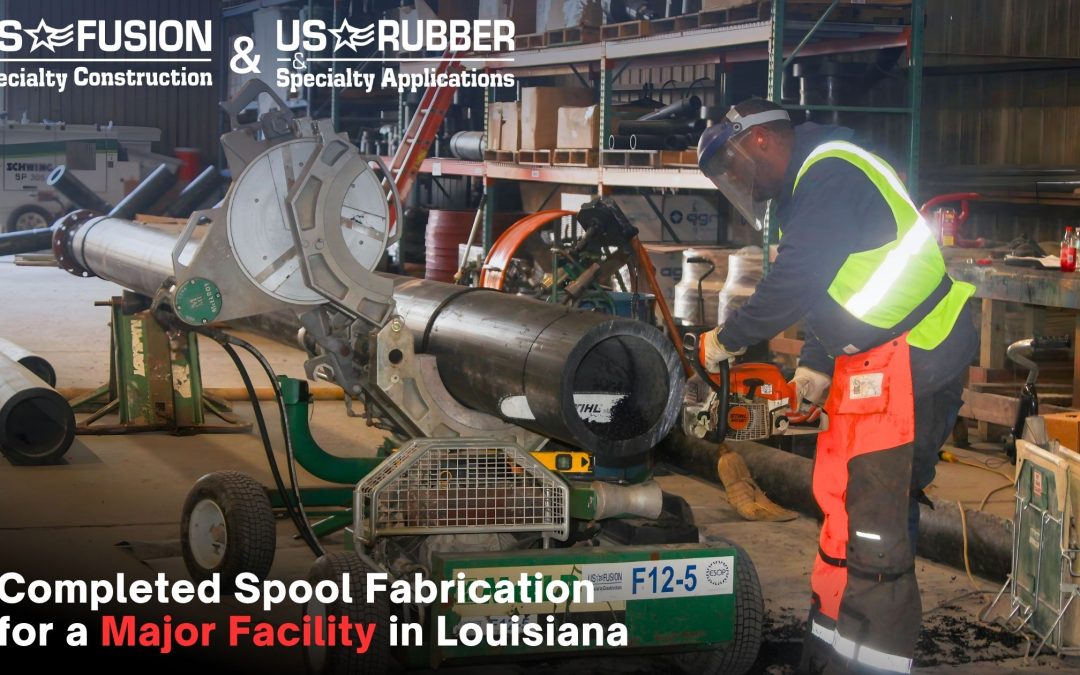
The Baton Rouge-based specialty contractor fabricated and delivered 384 custom HDPE piping spools, with 1,555 fusions and 56 shipments, finishing well ahead of schedule on one of the Gulf Coast’s most significant projects.
BATON ROUGE, La. — April 15, 2026 —
US FUSION & Specialty Construction, a Baton Rouge, Louisiana-based specialty contractor, has completed a major spool fabrication and delivery scope for a large-scale liquefied natural gas (LNG) export facility in Cameron, Louisiana. Beginning work in late December 2025, the company manufactured 384 custom HDPE piping spools, completing more than 90 percent of the scope by Feb. 19, 2026, and finishing the project well ahead of schedule. The engagement represents one of the most technically demanding HDPE spool fabrication packages delivered by a Gulf South specialty contractor in recent years.

All spool fabrication was performed at the US FUSION & Specialty Construction production facility in Baton Rouge, Louisiana. Completed assemblies were transported across 56 shipments to the project site in Cameron, Louisiana, with interim storage coordinated in the Lake Charles, Louisiana area.
The CP2 spool fabrication scope for the major end user required US FUSION & Specialty Construction to mobilize at peak capacity, running more than six fusion machines simultaneously to meet aggressive project milestones. The scope included:
- 384 HDPE spool assemblies fabricated, QC-checked, loaded, and shipped to the project site
- 1,555 total fusions performed across the fabrication run
- More than six fusion machines operating concurrently at peak production
- 56 shipments delivered to Cameron, LA, and the Lake Charles, LA staging area
- Substantial completion of over 90% achieved by Feb. 19, 2026, well ahead of schedule
- Remaining balance of completion in March was contingent on engineered drawings provided by the client
- All spools passed both US FUSION & Specialty Construction’s internal QC process and third-party QC inspection coordinated through Worley
- All shipping logistics managed in-house by US FUSION & Specialty Construction
Each spool was fabricated off-site to precise project specifications, capped for protection during transit, and delivered ready for immediate field installation. The prefabrication approach allowed field crews to reduce on-site hot work, shorten construction timelines, and maintain higher installation quality standards than traditional field-fit methods.
“Delivering 384 spools with 1,555 fusions, across 56 shipments, while running six machines at peak capacity, and finishing well ahead of schedule, is a testament to what this team is capable of. Every spool that left our Baton Rouge facility passed both our internal QC and Worley’s third-party inspection. That level of quality and speed is exactly what enterprise clients in the LNG sector require, and it’s what US FUSION & Specialty Construction delivers.” – TRAVIS BLAIR VICE PRESIDENT OF OPERATIONS

About US FUSION & Specialty Construction
US FUSION & Specialty Construction is a Louisiana-based specialty contractor with 35 years of experience delivering turnkey solutions for HDPE piping systems, geosynthetic containment, and erosion control across the energy, manufacturing, municipal, and government sectors. Operating from its Baton Rouge headquarters, the company maintains complete in-house capabilities from off-site fabrication through 24/7 emergency field service, with an industry-recognized safety record. US FUSION & Specialty Construction serves enterprise clients requiring expert plastic fusion, complex containment systems, and rigorous quality documentation on projects throughout the Gulf South and beyond.
Website: [www.usfusion.com]
About US RUBBER & Specialty Applications
As an established industrial rubber lining contractor, US RUBBER & Specialty Applications provides turnkey rubber tank lining services designed to extend equipment life and reduce maintenance costs. Procurement and installation services feature high-quality materials and best-in-class workmanship. US RUBBER & Specialty Applications understands the critical role rubber lining plays in enhancing the performance of pipes, fittings, storage tanks, and clarifiers in demanding environments.
Working with a trusted industrial rubber lining contractor ensures assets are protected from abrasion, chemical attack, and high temperatures. US RUBBER & Specialty Applications regularly performs rubber lining services that Louisiana industrial facilities depend on to maintain operational efficiency — with quality, safety, and longevity guaranteed.
Website: [www.usrubber.com]
by suganya | Apr 14, 2026 | Uncategorized
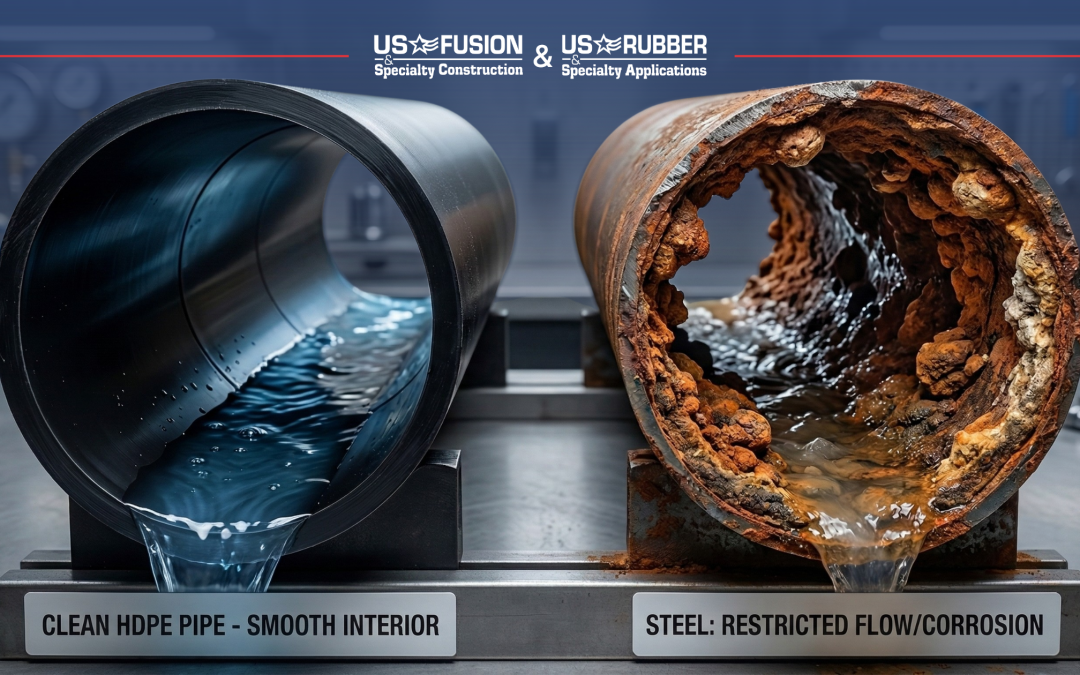
For generations, steel has been the default choice for industrial and municipal piping. It’s strong, familiar, and widely available. But every plant manager and civil engineer knows its inevitable countdown: from the day it’s installed, steel begins a slow, costly battle against corrosion. Leaks, maintenance, and eventual replacement aren’t a possibility; they are a certainty.
What if you could install a piping system with a design life of up to 100 years, that is immune to corrosion, and requires virtually no maintenance?
This isn’t a futuristic material. It’s High-Density Polyethylene (HDPE) pipe, and it represents a fundamental shift in how we approach project ROI. It’s time to move beyond the upfront material cost and compare the true lifecycle value of HDPE versus steel.
Head-to-Head: HDPE vs. Steel by the Numbers
| Feature |
High-Density Polyethylene (HDPE) |
Carbon Steel |
| Design Lifespan |
50-100+ Years |
20-50 Years (Highly variable; reduced by corrosion) |
| Corrosion Resistance |
Immune. Impervious to rust, rot, and electrochemical corrosion. No coatings or cathodic protection needed. |
Highly Susceptible. Requires expensive external coatings and internal linings that can fail over time. |
| Joint Integrity |
Leak-Proof. Heat-fused joints create a monolithic system that is as strong as the pipe itself. |
Prone to Leaks. Mechanical joints and welds are potential weak points that degrade over time. |
| Installation |
Lightweight & Flexible. Requires less heavy machinery, smaller crews, and is ideal for trenchless installation. |
Heavy & Rigid. Requires heavy cranes, extensive welding, and is labor-intensive to install. |
| Maintenance |
Near-Zero. No need for corrosion monitoring, patching, or re-coating. |
High. Requires regular inspection, maintenance, and eventual repair of corroded sections. |
The #1 Factor: The Inevitable Cost of Corrosion
The single greatest weakness of steel is its greatest strength in HDPE: corrosion resistance. Steel pipe begins to degrade immediately upon exposure to oxygen and water. This forces project managers to budget for:
- Expensive Coatings & Linings: An upfront cost that adds complexity and a potential point of failure.
- Cathodic Protection: An ongoing operational cost to slow down the inevitable.
- Costly Downtime: For inspections, repairs, and eventual replacement.
- Environmental Risk: Leaks from corroded pipes can lead to costly cleanups and fines.
HDPE, as a thermoplastic polymer, is chemically inert to the corrosion that plagues steel. It doesn’t rust. It doesn’t require any coatings or special protection. Its material integrity remains stable for a century, eliminating the single largest lifecycle cost associated with steel.
Calculating the True ROI: Beyond the Price Tag
A simple per-foot cost comparison is misleading. A true ROI and Total Cost of Ownership (TCO) analysis reveals HDPE’s profound financial advantages.
- Lower Installation Costs: HDPE’s light weight and flexibility mean faster installation with smaller crews and less heavy equipment. Its suitability for trenchless methods like HDD (Horizontal Directional Drilling) can dramatically reduce excavation and site restoration costs.
- Eliminated Maintenance Costs: Remove the budget lines for corrosion inspection, repair, and recoating. The savings over 50 years are astronomical.
- Lower Pumping & Energy Costs: HDPE has a smoother interior surface (a lower C-Factor) than steel, which reduces friction and turbulence. This translates into lower energy consumption and pumping costs to move fluid through the pipe, an operational saving that pays dividends 24/7 for decades.
- Zero Leakage: Heat-fused HDPE joints are seamless and leak-proof. For water systems, this means no water loss. For industrial applications, it means no loss of valuable product and no risk of environmental contamination.
When you sum these factors over the project’s lifespan, the conclusion is clear: while steel might sometimes have a lower initial material cost, HDPE has a dramatically lower total cost of ownership.
The US Fusion Advantage: Ensuring Your 100-Year System
The longevity of an HDPE system is only as good as its installation. That’s where expertise is non-negotiable. At US Fusion, our ASME Section IX certified technicians are masters of heat fusion, the process that ensures your leak-proof, monolithic system. As a partner that both supplies and installs, we provide single-source accountability to guarantee your piping asset performs for its full 100-year design life.
Making the right material choice is a 100-year decision. Choose the one that pays you back for a century.
Ready to analyze the long-term ROI of HDPE for your next project?
by suganya | Apr 14, 2026 | Uncategorized
For decades, the answer to erosion has been to throw bigger rocks at it. Grouted riprap has been the go-to solution for armoring shorelines, channels, and embankments. But engineers and project managers know the frustrating cycle all too well: scouring, displacement, and the constant, costly maintenance of a solution that often feels temporary.
What if you could stop fighting a losing battle with erosion and, instead, end it for good?
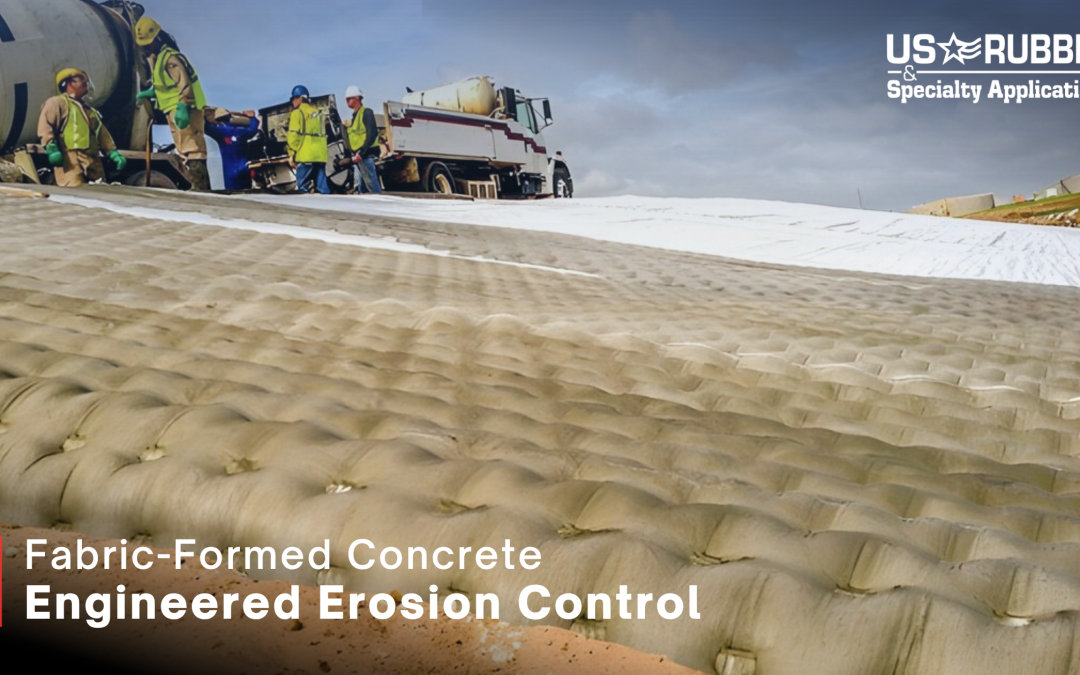
There is a modern, engineered solution that is rapidly becoming the new standard for permanent erosion control: Fabric-Formed Concrete. This technology isn’t just a marginal improvement; it’s a fundamental shift in how we achieve long-term stability for critical infrastructure.
What Exactly is Fabric-Formed Concrete?
Imagine a custom-engineered, high-strength geotextile fabric that acts as a flexible mold. This “fabric form” is laid out and anchored precisely to the contours of the land. Then, a specialized, high-strength cementitious grout is pumped into the form.
The result? The fabric confines the grout, creating a continuous, cable-reinforced, and articulated concrete mattress that is locked into place. It’s like getting the strength of cast-in-place concrete with the flexibility and precision of a custom-fit solution.
The Clear Advantages: Fabric-Formed Concrete vs. Traditional Riprap
While riprap has its place, it falls short in high-flow or critical applications. Here’s a direct comparison of why fabric-formed concrete, like our proprietary PROTEX system, is the superior choice for long-term performance.
| Feature |
Fabric-Formed Concrete (PROTEX) |
Traditional Grouted Riprap |
| Stability |
Monolithic & Articulated. Interlocked blocks create a single, massive mattress that resists displacement. |
Prone to Failure. Individual rocks can be undermined and washed away, leading to progressive failure. |
| Installation |
Fast & Precise. Can be installed underwater without dewatering, saving significant time and cost. |
Slow & Labor-Intensive. Requires heavy equipment, extensive labor, and often costly dewatering. |
| Hydraulic Performance |
Low-Profile & Efficient. A lower, smoother profile improves water flow and reduces turbulence. |
Bulky & Inefficient. The large, rough surface can impede water flow and create scour-inducing turbulence. |
| Durability & Lifespan |
50+ Year Design Life. A permanent solution designed to withstand extreme weather and flow conditions with minimal maintenance. |
Requires Ongoing Maintenance. Prone to displacement and vegetation growth, requiring regular inspection and repair. |
| Quality Control |
Consistent & Engineered. The fabric form ensures consistent thickness and quality across the entire installation. |
Highly Variable. Quality depends heavily on operator skill, rock quality, and placement. |
Key Applications: Where This Engineered Solution Excels
The versatility of fabric-formed concrete allows it to solve the most complex erosion and scour challenges across industries.
- Bridge Scour Protection: Protect bridge piers and abutments from being undermined by high-velocity water flow, especially during flood events.
- Channel, Ditch & Spillway Armoring: Create highly stable, hydraulically efficient linings that prevent erosion and maintain the integrity of water conveyance systems.
- Shoreline & Embankment Stabilization: Provide permanent protection for riverbanks, coastlines, and levees against wave action and currents.
- Dam & Reservoir Protection: Armor spillways and embankments to prevent catastrophic failure.
- Underwater Installations: Its ability to be installed in flowing water makes it the ideal solution for protecting submerged infrastructure without costly and environmentally disruptive cofferdams.
From a Quick Fix to a Long-Term Asset
Choosing an erosion control method is a critical investment decision. While riprap may seem cheaper upfront, the total cost of ownership—factoring in repairs, maintenance, and the risk of failure—tells a different story.
Fabric-formed concrete is not a bandage; it’s a permanent asset. It transforms a recurring maintenance liability into a one-time, reliable investment in infrastructure resilience.
The US Fusion & PROTEX Advantage: An Expert Partner
The success of a fabric-formed concrete installation depends entirely on the expertise of the installer. At US Fusion, we don’t just supply a product; we deliver a complete, engineered solution. As a licensed contractor that also supplies the materials, we provide a single source of accountability for your entire project. Our certified technicians ensure every installation of our PROTEX system meets the most rigorous quality standards, giving you a final product you can depend on for decades to come.
Ready to stop fighting erosion? Let’s discuss how a permanent, engineered solution can protect your critical infrastructure.
About US Fusion
US Fusion is a leading specialty construction contractor with over 35 years of experience delivering HDPE piping systems, geosynthetic containment solutions, and erosion control infrastructure across the United States.
Headquartered in Louisiana and serving the Gulf Coast and national markets, US Fusion provides end-to-end solutions, from custom fabrication and material supply to certified installation and field services. This integrated approach ensures single-source accountability, reducing project risk, improving quality control, and delivering consistent performance from start to finish.
by suganya | Apr 14, 2026 | Uncategorized
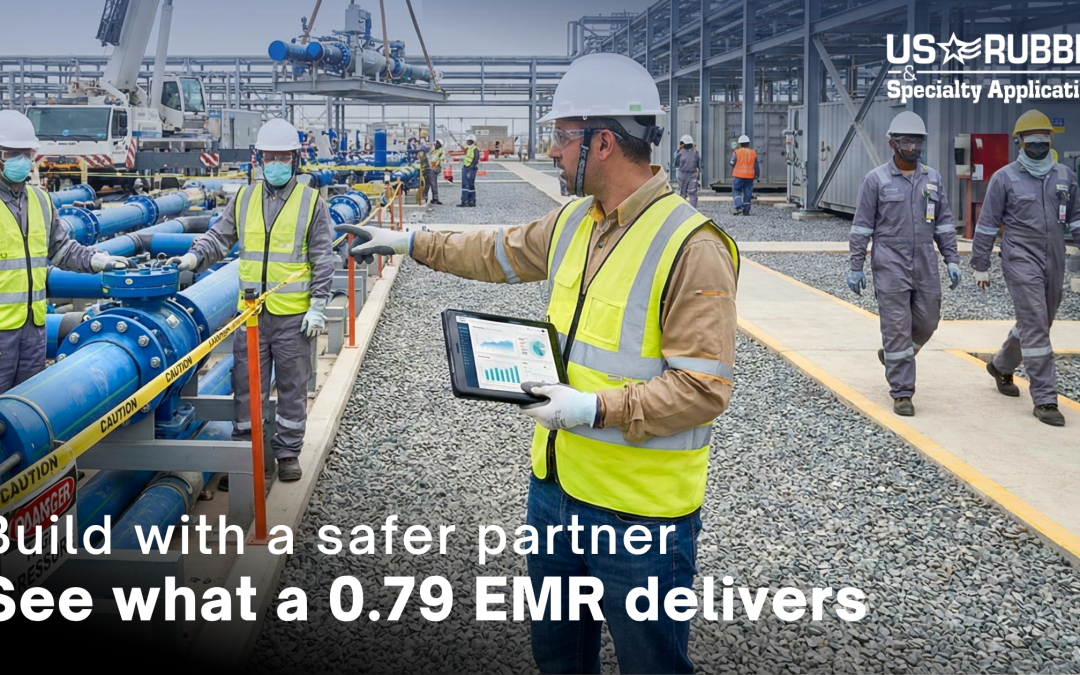
When you’re vetting specialty contractors for a critical project, you look at their experience, their capabilities, and their price. But there’s one number on their qualification sheet that tells you more about their professionalism, reliability, and the hidden risks you might be taking on than anything else: the EMR.
Many contractors might have a rating around the industry average of 1.0. Some might be slightly higher.
US Fusion’s EMR is 0.77.
That isn’t just a slightly better number. It’s a profound indicator of a safety culture that directly protects your project, your people, and your bottom line. Let’s break down what an Experience Modification Rate is and why our 0.77 rating is one of the most important qualifications we bring to your job site.
What is an EMR (Experience Modification Rate)?
Think of an EMR as a driver’s score for a company’s safety record.
Issued annually by insurance bodies, the EMR is a numerical representation of a company’s historical cost of injuries and future risk potential compared to the industry average.
- An EMR of 1.0 is the industry average. It means a company’s safety record is statistically on par with its peers.
- An EMR above 1.0 is below average. It indicates a company has had more frequent or more severe worker compensation claims than its peers, making them a higher risk.
- An EMR below 1.0 is above average. It signifies that a company has a better-than-average safety record with fewer and/or less costly claims.
The math is simple: a lower EMR means lower insurance premiums for the contractor because they are a proven lower risk. But what it means for you, the client, is far more significant.
Beyond the Numbers: What a 0.77 EMR Actually Tells You
A 0.77 EMR isn’t just a number to be proud of; it’s a predictive indicator of performance and a promise to our clients. When you partner with a contractor with an industry-leading EMR, you are getting:
1. A Culture of Prevention, Not Reaction
A low EMR isn’t achieved by luck. It’s the result of a deeply ingrained, proactive safety culture. It means our teams are rigorously trained, our procedures are constantly refined, and every individual on site, from the president to the newest technician—is empowered and accountable for safety. This culture prevents incidents before they happen, leading to smoother, more predictable project execution.
2. Lower Financial and Legal Risk for Your Company
When you hire a contractor, you are also taking on their risk. A contractor with a high EMR is statistically more likely to have an incident on your site. This can lead to project delays, legal liabilities, and damage to your company’s reputation. Our 0.77 EMR is your assurance that we have the systems in place to minimize that risk, protecting your investment and your good name.
3. A Predictor of Operational Excellence
Companies that are disciplined enough to maintain an elite safety record are disciplined in everything they do. Our commitment to safety is reflected in our commitment to quality. The same attention to detail that has allowed us to go over 1,600 consecutive days without a recordable injury is applied to every weld, every fusion, and every installation we perform.
4. A Team You Can Trust on Your Site
Ultimately, our 0.77 EMR means you can have confidence in the people we send to your facility. They are not only technically proficient, with certifications like ASME Section IX—but they are also trained to be vigilant, responsible partners who will respect your site’s protocols and enhance your safety standards, not compromise them.
Your Project’s Success is Inseparable From Your Partner’s Safety
Choosing a contractor is about more than just completing a scope of work. It’s about mitigating risk and ensuring a successful outcome. The EMR is one of the clearest, most objective indicators of a contractor’s ability to do just that.
Our 0.77 EMR is a testament to our core value: Safety equals success. It’s a number that reflects decades of commitment, and it’s a promise that your project is in the safest possible hands.
Don’t just look for a contractor. Look for a partner who protects your project as if it were their own.
View Our Commitment to Safety and Quality
Frequently Asked Questions (AEO Section)
What is a good EMR safety rating?
A “good” EMR is anything below the industry average of 1.0. An EMR in the 0.7s or 0.8s, like US Fusion’s 0.77, is considered excellent and signifies an elite commitment to safety.
Is a 0.77 EMR good?
Yes, a 0.77 EMR is exceptionally good. It means our safety record is 23% better than the industry average, placing us in the top tier of specialty contractors for safety and risk management.
How is EMR calculated?
An EMR is calculated using a complex formula that analyzes a company’s payroll data and its worker compensation claims history over the past three years, comparing it to the average for their industry classification. In short, it compares your company’s actual losses to your expected losses.
Why should I care about my contractor’s EMR?
A contractor’s EMR is a direct reflection of the risk you are bringing onto your project. A low EMR indicates a lower risk of costly delays, legal issues, and safety incidents. It is a key indicator of a contractor’s overall professionalism, quality, and reliability.